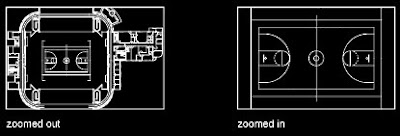
When you are working with the details in your drawing, you can zoom in for a closer view. You can change the magnification of a view by zooming in and out, which is similar to zooming in and out with a camera. ZOOM does not change the absolute size of objects in the drawing; it changes only the magnification of the view.
When you work with minute parts in your drawing, you may need to zoom out frequently to see an overview of your work. Use ZOOM Previous to return quickly to the prior view.
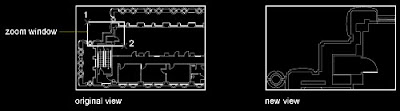
Zoom to Magnify a Specified Rectangular Area
You can quickly zoom on a rectangular area of your drawing by specifying two diagonal corners of the area you are interested in. The lower-left corner of the area you specify becomes the lower-left corner of the new display. The shape of the zoom area you specify does not correspond exactly to the new view, which must fit the shape of the viewport.
You can quickly zoom on a rectangular area of your drawing by specifying two diagonal corners of the area you are interested in. The lower-left corner of the area you specify becomes the lower-left corner of the new display. The shape of the zoom area you specify does not correspond exactly to the new view, which must fit the shape of the viewport.
Zoom in Real Time
With the Realtime option, you zoom dynamically by moving your pointing device up or down. By right-clicking, you can display a shortcut menu with additional viewing options.
With the Realtime option, you zoom dynamically by moving your pointing device up or down. By right-clicking, you can display a shortcut menu with additional viewing options.
Zoom to Magnify One or More Objects
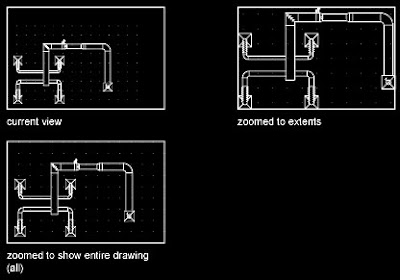
ZOOM Objects displays a view with the largest possible magnification that includes all of the objects you selected.
ZOOM Objects displays a view with the largest possible magnification that includes all of the objects you selected.
Zoom to View All Objects in the Drawing
ZOOM Extents displays a view with the largest possible magnification that includes all of the objects in the drawing. This view includes objects on layers that are turned off but does not include objects on frozen layers.
ZOOM Extents displays a view with the largest possible magnification that includes all of the objects in the drawing. This view includes objects on layers that are turned off but does not include objects on frozen layers.
ZOOM All displays either the user-defined grid limits or the drawing extents, whichever view is larger.
PAN
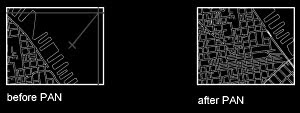
You can shift the location of your view by using PAN or by using the window scroll bars. With the Realtime option of PAN, you pan dynamically by moving your pointing device. Like panning with a camera, PAN does not change the location or magnification of objects on your drawing; it changes only the view.
You can shift the location of your view by using PAN or by using the window scroll bars. With the Realtime option of PAN, you pan dynamically by moving your pointing device. Like panning with a camera, PAN does not change the location or magnification of objects on your drawing; it changes only the view.
By right-clicking, you can display a shortcut menu with additional viewing options.
The cursor changes to a hand cursor. By holding down the pick button on the pointing device, you lock the cursor to its current location relative to the viewport coordinate system. The drawing display is moved in the same direction as the cursor.
When you reach a logical extent (edge of the drawing space), a bar is displayed on the hand cursor on that edge. Depending on whether the logical extent is at the top, bottom, or side of the drawing, the bar is either horizontal (top or bottom) or vertical (left or right side).
When you release the pick button, panning stops. You can release the pick button, move the cursor to another location in the drawing, and then press the pick button again to pan the display from that location. To stop panning at any time, press ENTER or ESC.
When you release the pick button, panning stops. You can release the pick button, move the cursor to another location in the drawing, and then press the pick button again to pan the display from that location. To stop panning at any time, press ENTER or ESC.

If you enter -pan at the Command prompt, PAN presents alternative prompts on the command line.
This version of PAN works in two ways. You can specify a single point, indicating the relative displacement of the drawing with respect to the current location, or (more commonly) you can specify two points, in which case the displacement is computed from the first point to the second point.
You cannot use PAN transparently during VPOINT or DVIEW, or while another ZOOM, PAN, or VIEW command is in progress.
Specify base point or displacement: Specify a point (1)
The point you specify indicates either the amount to move the drawing or the location in the drawing to be moved, depending on how you respond to the next prompt.
Specify second point: Press ENTER or specify a point (2)
If you press ENTER, the drawing is moved by the amount you specified in the Specify Base Point or Displacement prompt. For example, if you specify 2, 2 at the first prompt and press ENTER at the second prompt; the drawing is moved 2 units in the X direction and 2 units in the Y direction. If you specify a point at the Specify Second Point prompt, the location of the first point is moved to the location of the second point.
To access the Pan shortcut menu, right-click in the drawing area while PAN is active.
Exit – Cancels PAN or ZOOM.
Pan – Switches to PAN.
Zoom – Switches to ZOOM in real time.
3D Orbit – Switches to 3DORBIT. (We will discuss this as we progress to 3D)
Zoom Window – Zooms to display an area specified by a rectangular window.
Zoom Original – Restores the original view.
Zoom Extents – Zooms to display the drawing extents.
With this much reference and learning we can proceed to complete our assignment. Tomorrow we will learn commands needed to draw the basic layout of our assignment. That will include Erase, Move, Offset and Fillet with an Inquiry command. We will use Modify and Tools menu for this purpose.
Stay tuned…!
Stay tuned…!
No comments:
Post a Comment