Let us start with Circle
You can create circles in several ways. The default method is to specify the center and the radius. Three other ways to draw a circle are shown in the illustration.

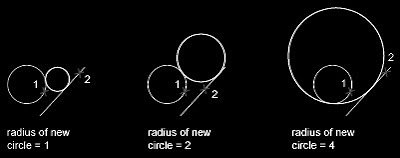
Draw a Circle Tangent to Other Objects
The tangent point is a point where an object touches another object without intersecting it. To create a circle that is tangent to other objects, select the objects and then specify the radius of the circle. In the illustrations below, the bold circle is the one being drawn, and points 1 and 2 select the objects to which it is tangent.
 To create a circle tangent at three points, set running object snaps (OSNAP) to Tangent and use the three-point method to create the circle.
Ellipse
If you are drawing on isometric planes, use an ellipse to represent a circle viewed from an oblique angle. The easiest way to draw an ellipse with the correct shape is to use the Isocircle option of ELLIPSE. The Isocircle option is available only when the Style option of Snap mode is set to Isometric (see DSETTINGS).
Note - to represent concentric circles, draw another ellipse with the same center rather than offsetting the original ellipse. Offsetting produces an oval-shaped spline that does not represent foreshortened distances as you would expect.
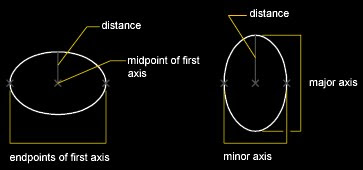 The shape of an ellipse is determined by two axes that define its length and width. The longer axis is called the major axis, and the shorter one is the minor axis.
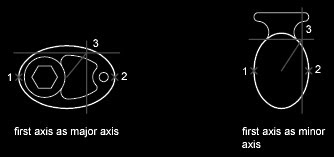
The illustrations below show two different ellipses created by specifying axis and distance. The third point specifies only a distance and does not necessarily designate the axis endpoint.
 If you are drawing on isometric planes to simulate 3D, you can use ellipses to represent isometric circles viewed from an oblique angle. First you need to turn on Isometric Snap in the Drafting Settings dialog box.
Donut
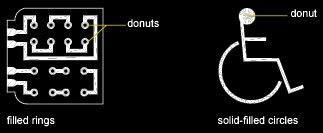
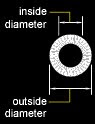
Donuts are filled rings or solid-filled circles that actually are closed polylines with width.
To create a donut, you specify its inside and outside diameters and its center. You can continue creating multiple copies with the same diameter by specifying different center points. To create solid-filled circles, specify an inside diameter of 0.
To create a donut, you specify its inside and outside diameters and its center. You can continue creating multiple copies with the same diameter by specifying different center points. To create solid-filled circles, specify an inside diameter of 0.
 Draw menu: Donut
Command line: donut
Specify inside diameter of donut
If you specify an inside diameter of 0, the donut is a filled circle.
Specify outside diameter of donut
Specify center of donut or
 The location of the donut is set based on the center point. After you specify the diameters, you are prompted for the locations at which to draw donuts. A donut is drawn at each point specified (2). How the interior of a donut is filled depends on the current setting of the FILL command. If the Fill is ON the boundary of donut will be filled solid. If the Fill is Off the boundary of the donut will be hollow with outline.
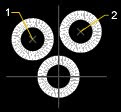 Exercise – Try to put some objects of curvilinear shapes into Assignment3 using the commands above. Those could be Furniture pieces, accessories, diagrams, paving patterns, plants and bushes, etc.
Whatever curvilinear shapes you would not be able to draw with above commands would be possible with Spline. We will explore it tomorrow, stay tuned…!
No comments:
Post a Comment